Tuesday, August 27, 2013

Homemade Butter | Sri Krishna Jayanti Recipe

step by step instructions to make homemade butter

Homemade Butter | Krishna Jayanti Recipe

Prep Time: 5 days
Cook time:10 minutes
Serves: 8 servings
Happy Krishna Janamashtami to all of you. This festival is celebrated not only in India but all over the world where Krishna’s devotees live. Usually we are on fast or vrat this day, but at the time of Krishna’s birth at 12:00pm, Bhog is offered to Lord Krishna and then Vrat is opened. Home made makhan or butter is Lord Krishna’s favorite and associated with his childhood days, in north India it is offered to him at the time of his birth. Today’s recipe is homemade butter or makhan, falls under the category of Cooking Basics. This is one ingredient recipe and can be used in hundreds of recipes, especially in baking. Ingredients required and detailed instructions for the recipe are as follows:

Ingredients:
Malai or homemade cream- 2 cups
Cold water- 1 and ½ cups

Instructions: 

After boiling milk when it cools a thick layer of cream is collected at the top surface known as Malai.
Collect this in a bowl, depending upon the quantity of milk you can get sufficient amount of malai within 4-5 days.

After boiling milk , when it is cooled should be placed in fridge, thick layer of malai is formed in it.
Take all the collected malai or cream in a big bowl, with the help of hand blender or in blending jar blend it thoroughly for 3 minutes. Traditionally wooden churner is used for blending it, but now a days hand blender or blending jar is easy. 


Add chilled water to it and blend it for another 5-6 minutes. You will see that butter starts extracting from cream and forming a dough.
Collect it in a bowl.


Wash it twice by adding fresh water to it.
Finally collect this butter in a bowl, Homemade butter is ready.

Notes:

Cold water helps forming butter quickly.
Butter can be applied directly on parathas or can be used in baking cakes, cookies etc. Some recipes require unsalted butter, you can use this homemade butter. You can also use this butter in Pav bhaji or makhani dal.

Read more

Saturday, August 24, 2013

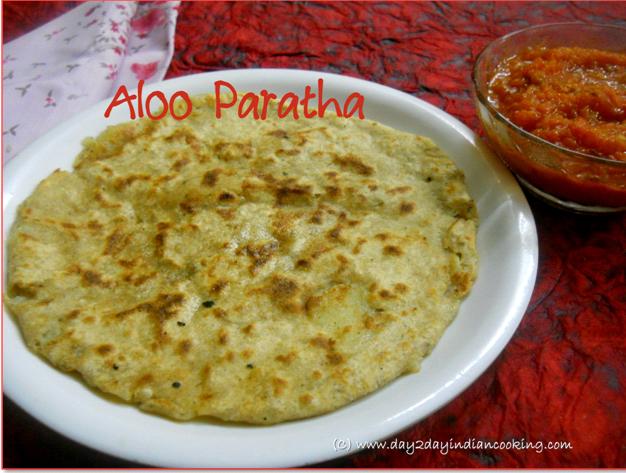
Aloo Paratha

recipe of stuffed paratha made with mashed potatoes and spices

Aloo Paratha

Prep Time: 15 minutes
Cook time:15 minutes
Serves: 4servings
Aloo paratha is a Punjabi stuffed bread recipe prepared with boiled mashed patotoes and spices, a very popular North Indian breakfast recipe, this can be served with curd/tomato chutney or simply with a cup of tea. Ingredients required and detailed instructions for the recipe are as follows.

Ingredients:

potatoes- 6-8 boiled, peeled and grated
Wheat flour-2 cups(kneaded)
Salt-to taste
Onion-1
Green chillies-4
Red chilli powder-1/2 teaspoon
Garam masala powder-1/2 teaspoon
amchur powder-1/2 teaspoon
Dry mint powder-1 tablespoon
Water- for kneading the dough
Ghee-1 tablespoon

Instructions: 

Knead wheat flour with the help of water. Dough should be soft.
Chop onions and green chillies.
For stuffing, mix salt, red chilli powder, amchur powder, garam masala powder, dry mint leaves powder, chopped onion and green chillies to grated potatoes , mix well. 


Take small ball of wheat flour dough, roll out small sized chapati, apply some ghee over it. Place a small portion of stuffing over it. Secure the edges of chapatti. (refer to the pic.) Repeat the same process with the remaining dough and stuffing.
Take one peda( potato stuffed chapati ball), dust it with dry wheat flour, gently roll out paratha.
Heat griddle or tawa, place paratha over it, roast on high flame by applying ghee on both sides.
Prepare all the parathas with the same process.


Notes:

 you can substitute mint leaves powder with fresh mint leaves or chopped green coriander leaves too.
Boiled potatoes should be cooled properly , else rolling out paratha will be difficult.
When you prepare stuffed balls earlier, rolling out paratha will be easier .
You can also try other paratha recipe Sai thoom ja phulka | green garlic paratha . Gur ka paratha

By  

Read more

Friday, August 16, 2013

Potato and Sun Dried Lentil Drops Curry

how to make potatoes and sundried lentil drops curry
Potato and Sun Dried Lentil Drops Curry
Prep Time: 5 minutes
Cook time:10 minutes
Serves: 4servings
Potatoes and Sundried lentil drops is quick and easy to prepare pressure cooker curry recipe. Actually this is also a No Onion No Garlic Recipe, can be prepared without any preparations, when you don’t have enough time to make preparations, this recipe goes well with puri, rice pulao( sindhi bhugal chawar), it also goes well with kachouri. In sun dried lentil drops( urad dal wadi) whole crushed spices are already included , it turns out as spicy dish. In this recipe I have used mix dal wadi. Ingredients required and detail instructions for the recipe are as follows:
Urad dal wadi or mix dal wadi-5-6
Potatoes- 3
Tomatoes-4
Salt –to taste
Red chilli powder-1/2 teaspoon
Turmeric powder- ¼ teaspoon
Cumin seeds- ½ teaspoon
Coriander powder- 1 tablespoon
Water- 1 cup
Oil- 1 tablespoon

Instructions:

Peel and chop potatoes
Puree tomatoes
Heat oil in a pressure cooker.
Deep fry wadis in it, this will take hardly one minute, as they are golden in color remove them pressure cooker, slightly crush them.
In the same oil in pressure cooker, add cumin seeds as they crackle add red chilli powder and immediately add tomato puree to it, add the remaining spices( turmeric powder, coriander powder and salt) and potatoes along with crushed wadis.
Roast on medium to low flame for 3-4 minutes, add 1 cup water to it.
Cover the lid and pressure cook it till 2 whistles on high flame and one on low flame.
After cooling completely, check the consistency, if you want more thick gravy, slightly crush few potato pieces and let it boil for another 2-3 minutes.
Notes: Ready made sundried lentil drops( urad dal wadi ) have lot of spices in it, hence no need to add garam masala powder to it.


Read more

Sunday, August 11, 2013

Moong Dal Khichdi | Split Green Gram Khichdi

Moongdal Khichdi
By
Prep Time: 30 minutes
Cook time:15 minutes
Serves: 4servings

Moong Dal Khichdi is a very soothing and light recipe .Nice combinations of rice grains and legumes, can be prepared at any time in lunch or in dinner. Usually khichdi is prepared with sufficient amount of water but sindhi’s like khichdi with each and every grain separated. This khichdi goes well with toori bhaji and curd. Ingredients required and detailed instructions for the recipe are as follows:

Ingredients

Chilke wali moong dal(split green gram)- ½ cup
Basmati rice-1 cup
Pepper corns-1/2 teaspoon
Cumin seeds-1 teaspoon
Hing(asafoetida)-1/8 teaspoon
Ghee-1 tablespoon
Turmeric powder -1/4teaspoon
Salt-to taste
Water- 2 & ½ cups

Instructions:

wash and soak dal and rice together for ½ an hour. Take a heavy bottomed pan, heat ghee in it, add cumin seeds and pepper corns to it, as cumin crackles, add asafoetida , add soaked dal and rice without water, add turmeric powder and salt to it, mix well.
Roast on high flame till rice grains start sticking to pan, pour water over it, mix well and bring it to boil on high flame, when water is 90% absorbed, adjust the flame to low, cover the lid and cook till water is absorbed completely.
Serve hot with curd or any vegetable of your choice.
recipe of making moong dal khichadi without pressure cooker

Notes: Quantity of water may vary depending upon the quality of rice, how much water it absorbs.
It can be pressure cooked to , (while pressure cooking if you are taking 1 cup rice and dal only one cup water will be required follow 1:1 ratio.), but it taste good if prepared in wide pan or kadhai


Read more

Wednesday, August 7, 2013

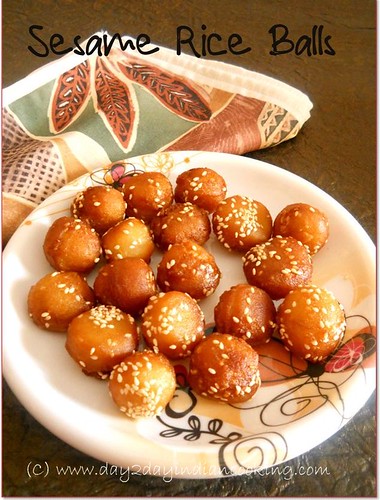
Sesame Rice Balls

step by step instructions for making the recipe of sesame rice balls
Sesame Rice Balls
By
Prep Time: 16 hours
Cook time:15 minutes
Serves: 4servings
Sesame rice balls is a deep fried dessert recipe. Earlier preparations are required for this recipe. The secret behind its perfection lies in making right dough for this and sufficient skill in deep frying the balls. After 2-3 trials you will be able to make this perfectly. Usually this recipe is prepared with rice flour, but I am making it with soaked and further grinded rice. I found its texture was better than prepared with rice flour, hence this recipe includes whole rice in it. Ingredients required and detailed instructions for the recipe are as follows:

Ingredients
Rice- 1 and ½ cups
Sugar- ½ cup
Sesame seeds or white til- 1 tablespoon
Milk-1/2 cup
Baking soda or sodium bicarbonate- 2 pinches

Instructions: Wash and soak rice in plenty of water.

Change the water wash them again once.
Pour them on a strainer so that extra water drains out.
Place rice in a grinding jar, add milk and sugar with it, grind it to fine paste.>

Check rice by pressing it with fingers if small particles of rice are seen grind it again for 2-3 minutes.
Transfer this mixture in a bowl, add sesame seeds to it( preserve 1 teaspoon seeds for further process)
Mix well for 3-4 minutes , mixture will become light and fluffy.
Now add baking soda to it, mix once.
Cover the mixture and place it in fridge for 6-8 hours.
After 8 hours you will see that mixture is thick enough, you can easily make balls of it .
Make small sized balls of it, heat sufficient oil in a pan or kadhai.
Sprinkle sesame seeds over the prepared balls, take one ball and slightly shape it in between your palms, so that sprinkled sesame seeds stick to it properly.
Prepare all the balls in the same manner.
Deep fry 5-6 balls at a time on medium to low heat as they starts browning from bottom, turn them and let them fry from another side.
Fry all the balls in the same manner, serve hot.
Notes: Adding milk and baking soda makes the ball soft and creamy inside.
You can easily make the balls with rice flour too, but placing batter in fridge for 6-8 hours is must for good texture and taste.
Deep frying them from medium to low flame will helps in cooking them properly, frying on high flame will change the color but they will remained uncooked inside.

You can also try another recipe made with rice flour which is savory snack recipe called farey

Read more

Saturday, August 3, 2013

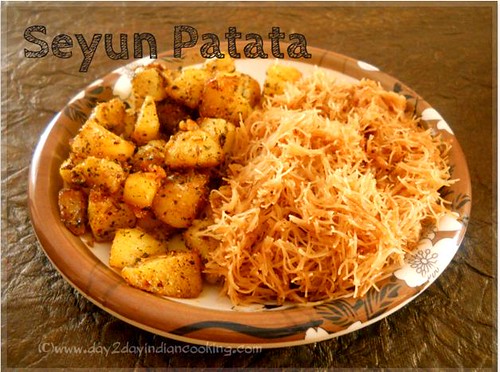
Seyun Patata | Sindhi Breakfast Recipe

how to make seyun patata sindhi breakfast food recipe
Seyun Patata | Sindhi Breakfast Recipe
By
Prep Time: 5 minutes
Cook time:10 minutes
Serves: 4servings
Seyun patata is a Sindhi Breakfast recipe. Seyun means vermicelli and patata means potatoes . This is a nice combination of sweet and savoury flavours. In sindhi breakfast recipes , there is an other recipe called bhori roti which is also a perfect combination of sugar and salt , consumed in winters, I will post it as soon as possible. As far as this recipe is concerned it is a combo of 2 recipes, for patata recipe you can refer to my earlier post taryal patata in that post I have mentioned the ingredients and detailed instructions for recipe , the only difference is that as you can see in picture in this potato recipe I have used dry mint powder, which is not used in earlier post. In this blog post I am giving the ingredients and instructions for seyun recipe only. Ingredients required and the detailed instructions for the recipe of seyun are as follows.

Ingredients
Vermicelli- 2 cups
Water-3/4 cup
Sugar-2 & ½ tablespoon
Green cardamom-3-4
Ghee- 1 tablespoon
Dry fruits(raisins, cashewnuts and almonds)- 1 tablespoon(optional)

Instructions: Mix sugar and water together, leave it.
Heat ghee in a heavy bottomed pan.
Add dry fruits to it, roast for a minute and remove them from pan.
Add green cardamoms as they float on top.
slightly crush vermicelli and add it to ghee.
Roast vermicelli on medium to low flame, stirring continuously till they are golden in color.
Add water and sugar mixture to it. Adjust the flame to high, as water starts boiling, simmer the flame, cover the lid, let it cook for another 3-4 minutes, check if water is soaked up completely, switch off the flame.
Garnish it with roasted dry fruits.
Serve hot with taryal patata.
Notes: Texture of seyun( each grain separated) depends upon proper roasting and quantity of water, after roasting when you add water , it should be sufficient enough to soak vermicelli, extra water will made them soggy and sticky.
Any type of vermicelli can be used .You can substitute sugar with sugar free too.


Read more